Many aspiring instructors believe they need expensive cameras, microphones, and professional studios to create a Udemy course that sells.
It’s quite common for many aspiring instructors to think that creating a selling Udemy course needs expensive Things.
However, high production quality doesn’t always need to cost a lot of money. With the right strategies and budget-friendly tools, you can create an engaging course without spending too much.
This blog post will tell you about cost-effective solutions that will help you create a Udemy course while keeping the expenses down.
Table of Contents
Low-Cost Tools and Software
You don’t need premium software and gear to create a Udemy course. See, you’ll find plenty of free or not too costly tools that will help your Udemy course have good sound, you know, clear audio, and look nice, like properly edited videos.
If you pick the right ones that fit what you need and your budget, you can create a professional-looking course that students will find useful and interesting, without spending too much “dollars” on fancy equipment.
It’s just like baking a delicious cake with normal, easily available ingredients and the usual tools from your kitchen. You don’t have to go and buy all that professional baking stuff to make a really good cake, right?
Free and Cheap Tools for Recording and Editing
➡️ Microphones (FIFINE K669B, Audio-Technica ATR2100X)
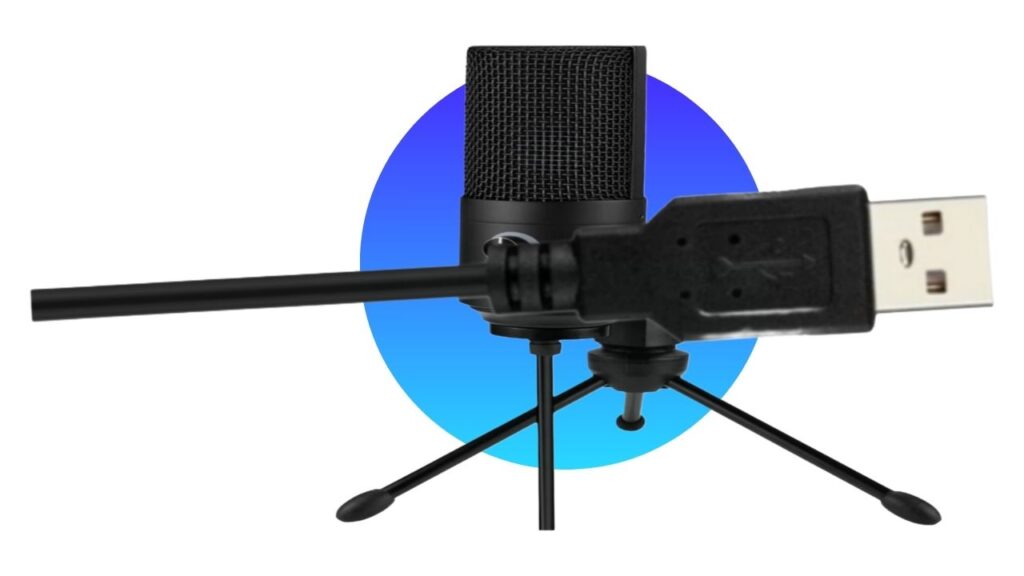
I think you should get the same thing. Everyone always recommends it. This microphone makes the sound much better than the microphone inside your laptop. Also, it doesn’t cost much money. Good sound is very important for learning well. These microphones are good quality and not expensive.
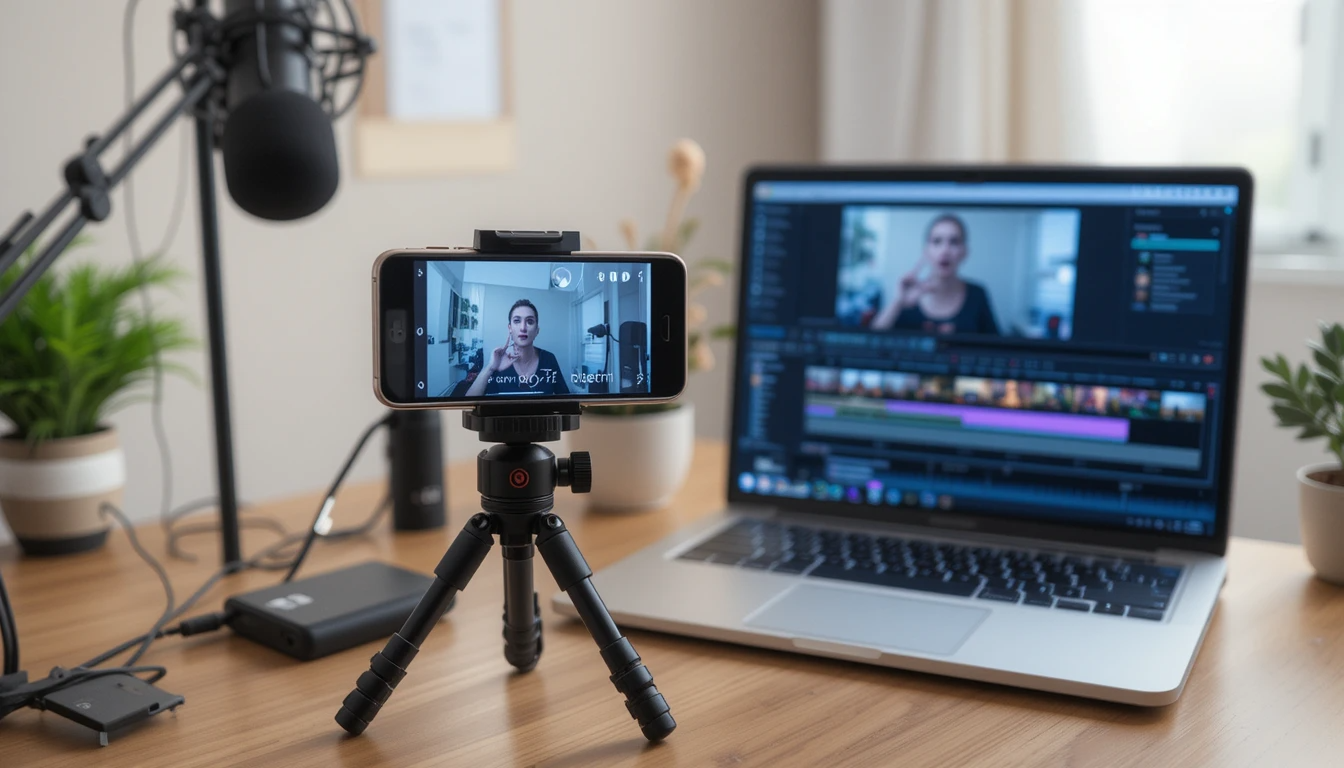
➡️ Video Recording (Smartphone with 1080p+)
Most new smartphones have such cameras that can do high definition (1080p or more) recording, which is perfectly fine for online lectures. Because of this reason, you will not have the need to buy a separate video camera, which can save a lot of money can be saved.
➡️ Screen Recording (OBS Studio, Screencast-O-Matic)
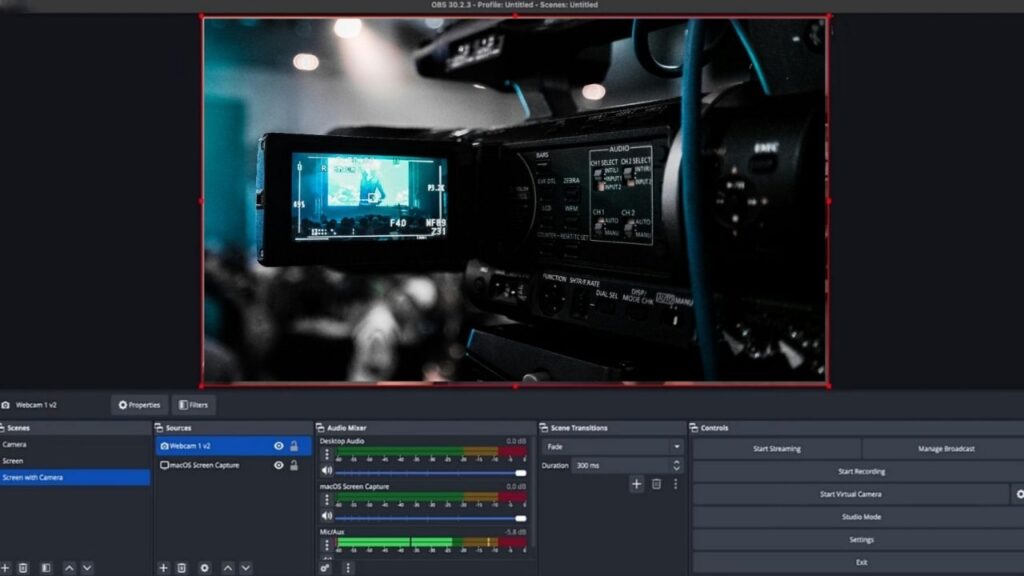
These free tools allow instructors to easily record their computer screens, which is essential for teaching software, giving presentations, or demonstrating online processes. They offer necessary features without any cost.
➡️ Video Editing (DaVinci Resolve, Shotcut)
hese are powerful, professional-grade video editing software options that are available for free (DaVinci Resolve has a paid studio version, but the free version is very capable) or at no cost (Shotcut is open-source). This counters the idea that you need to pay a monthly subscription for video editing software.
➡️ Lighting
Imagine, if I tell you, ‘Hey, there’s something in a dark room. Tell me what it is.’ What will you say? You can’t see anything in the dark, right? So, you can’t be sure what that thing is. It could be a chair to sit on, a book to read, or anything at all! You can only see it clearly if there’s light in the room.
Now, think if I put that same thing in a room with good light, and then I ask you, ‘Okay, now tell me what it is.’ Then you can easily see it and tell me exactly what it is, like ‘It’s a red book’ or ‘It’s a small table.’
See Bro, Good light is very important for making videos look clear and professional, like the ones you see on TV. Natural light from the sun is free. You don’t have to pay for it. And these LED ring lights, they don’t cost too much money, and they can make your videos look much, much better, especially when there isn’t much sunlight coming in.
By using these tools, you can efficiently create a Udemy course that looks professional without unnecessary expenses.
Filming on a Budget
A well-structured recording setup doesn’t require an expensive studio. You can achieve high-quality results with basic equipment and a proper setup.
How to Set Up a DIY Studio at Home
- Choose a quiet, well-lit room with minimal background noise.
- Use a neutral backdrop, such as a plain wall or a simple fabric screen.
- Position a desk lamp or ring light at a 45-degree angle for even lighting.
- Reduce echo using soft furniture, curtains, or foam panels.
Using a Smartphone for High-Quality Video
- Set your phone to 1080p or 4K resolution.
- Use a tripod or stack books to keep the camera steady.
- Position the phone at eye level for a professional look.
- Ensure good lighting to avoid grainy footage.
With these simple tricks, you can create a Udemy course that meets high production standards without investing in expensive cameras.
Audio Matters More Than Video
The sound quality of your course is very important, perhaps even more so than how good the video looks. In fact, bad sound can be a big problem.
Viewers of your course will tolerate poor quality video, even if it’s a little dim or poorly lit. But if the audio is poor, such as static, hard to hear, echoing, or has a lot of background noise, people will get frustrated and stop watching your course.
Best Budget Microphones for Crisp Sound
➡️ Lavalier Mics (like BOYA BY-M1, Rode SmartLav+)
These will be like small mics that you can clip onto your shirt. Like how the news reporters use. Because you can fix them near your mouth, your voice will be very clear for the students to hear.
➡️ USB Microphones: FIFINE K669B
USB Microphones, such as the FIFINE K669B model or the Blue Snowball, are made to be super simple, perfect for people starting. It’s very straightforward to use. You see the USB port on your laptop or computer where you put your memory stick? You just plug the microphone’s cable directly into that port.
You don’t need any other separate machine or complicated settings. The computer will usually find it automatically. That’s why we call it ‘plug and play’. Just plug it in, and it’s ready for recording your voice.
➡️ Shotgun Microphones
These mics are designed to capture sound mainly from the direction they are pointed, which helps reduce unwanted noise from the sides or behind.
Additional Audio Tips to create udemy course
1.Record in a quiet space to avoid background noise.
If these noises, such as a fan running, traffic noise from outside, people talking nearby, or a dog barking, are recorded along with your voice, it will make your audio sound inferior and unprofessional. It will be difficult for students to hear you properly, so record your audio in a quiet place at the right time.
2.Use a pop filter to minimize plosive sounds.
If you strongly pronounce sounds like ‘P’ and ‘K’, you’ll feel a puff of air. This burst of air, if it goes straight into the microphone, can cause a loud, unwanted noise in your recording. These are often called plosive sounds, and they can sound jarring when you play your audio
3.Speak clearly and at a steady pace.
If you mumble or talk very fast, students will find it hard to understand what you are teaching. If you talk too slowly, they might get bored. So make sure you pronounce your words correctly. Speak at a normal, comfortable speed, like you are explaining something important to your friend.
By prioritizing audio quality, you can greatly enhance your course’s professionalism while keeping costs low.
Editing Without Expensive Software
Udemy Course Creation doesn’t require costly editing software like Adobe Premiere Pro. Free alternatives such as DaVinci Resolve, Shotcut, and OpenShot offer essential editing features like trimming, transitions, and audio enhancements.
These tools allow you to polish your course videos professionally without a hefty investment, making content creation accessible.
Free Alternatives to Premium Editing Tools
- DaVinci Resolve: Professional-grade color correction and video editing.
- Shotcut: User friendly interface with essential editing features.
- iMovie (Mac Users): Simple yet powerful for quick edits.
- Kapwing (Online): Great for basic trimming, captions, and enhancements.
Basic Editing Tips for a Polished Course
Trim unnecessary pauses and mistakes
Let’s say you’ve already recorded your course video, but as you review it, you notice a few things that could be better. For example, you may have paused for a moment while you were thinking or made a small mistake in your explanation. The first basic editing tip is to reduce those unnecessary pauses and mistakes.
You should remove the “umms,” the long silences where nothing is happening, and any times you said something wrong and then corrected yourself. This makes your video flow much smoother and keeps your audience engaged without getting bored
Use text overlays and annotations to emphasize key points
To help your students understand the important parts of what you’re saying, use text overlays and annotations. Text overlays are words that appear on the screen, like highlighting a key term or summarizing a point you just made.
Annotations are things like arrows, circles, or underlines that you can draw on the screen to draw attention to something specific you’re showing. Using text overlays and annotations can therefore help students pay closer attention.
Add background music subtly to enhance engagement
To make your course more interesting and engaging, you can add background music subtly. Note this word “subtly”.
The music shouldn’t be so loud that it distracts from your voice or makes it hard to hear you. Instead, it should be a quiet, gentle sound playing in the background that creates a more pleasant and engaging learning atmosphere.
Think of it like the background music in a movie or a documentary. It adds to the overall feeling.
Using free editing software ensures you can create a Udemy course with a polished, professional look without costly subscriptions.
Creating Engaging Course Content Without Fancy Equipment
Engaging course content matters more than high end production. Simple enhancements can improve student experience without requiring expensive tools.
Simple Ways to Enhance Learning
- Use PowerPoint or Google Slides for visual explanations.
- Incorporate PDF resources for additional learning material.
- Utilize screen recordings for step by step demonstrations.
- Add quizzes and assignments to improve student interaction.
A well-structured, informative course keeps students engaged, even if recorded on a budget.
Final Tips for a Professional Look Without the Cost
If you want your online course to look really good, like those high-quality courses you see online. You might think you need expensive cameras and fancy equipment, right?.
But the good news is that even if you don’t have a lot of money to spend on all that stuff, you can use a few simple tricks to make your course look professional.
Lighting Hacks
- Position yourself facing a window for natural lighting.
- Use affordable LED ring lights for consistent lighting.
- Avoid overhead lighting, which can cast shadows.
Backdrops & Setup
- A plain, clutter-free background keeps the focus on you.
- Green screens allow for custom backgrounds if needed.
Editing Tricks for a Clean Look
- Keep transitions simple and smooth.
- Use captions to improve accessibility.
- Adjust audio levels to maintain consistency.
Applying these final touches ensures your course appears professional without additional expenses.
Creating a high-quality Udemy course doesn’t require an expensive setup. With budget-friendly tools, a DIY home studio, good audio practices, free editing software, and engaging content, you can successfully create a Udemy course without overspending.
By following these steps, you can launch your course and start earning passive income while keeping costs to a minimum. Now, it’s time to take action and bring your course idea to life!